DIY Cowboy Costume for Kids
By: Highlights Editorial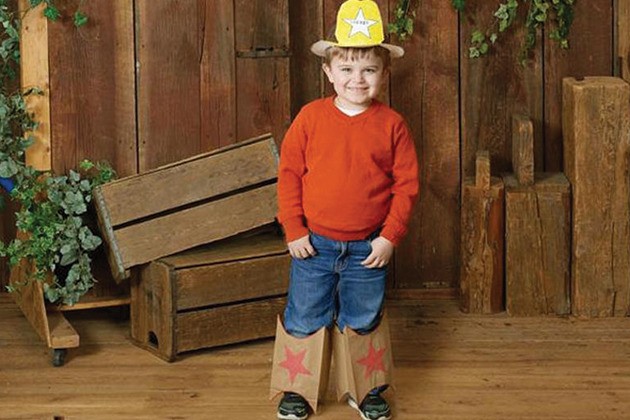
Costumes like these easy-to-make cowboy boots and hat are perfect for when your kid can’t decide what to dress up as for Halloween or when you realize the costume parade is a week earlier than you thought. Grab a paper plate and some paper bags. Add markers and scissors (a.k.a., fine motor-skills work), and suddenly there’s a new sheriff in town.
What You'll Need
What to Do
-
What You’ll Do (for the Cowboy Hat):
- To make the hat brim, draw a circle 1½ inches from the edge of the paper plate.
- Draw a cowboy hat in the center of the plate, with the bottom of the design touching the circle. Then color your hat with markers or crayons.
- Cut away the area between your hat and the circle, leaving the bottom of your hat attached to the brim.
- Bend the cowboy hat part forward and add your name!
-
What You’ll Do (for the Cowboy Boots):
- Cut off the bottom of two paper lunch bags.
- Trim the bags to have curved edges.
- Cut stars from colored paper and glue them to the bags. Decorate your boots with markers.
- Put the boot on by carefully sliding one foot through each bag.
Extend the Fun
Younger kids: Take a trip to your local library to pick up books about cowboys and cowgirls. Encourage your kids to look for books that show what cowhands do, where they live or what they wear. Ask the children’s librarian for book suggestions and look for both fiction and nonfiction books.
Older kids: Your child is probably going to develop a cowboy persona in this hat and these boots. Encourage your child to make up a story about a cowboy or a cowgirl. Ask questions to help develop the story: Who is the main character? What is the name of the story? Then encourage your child to write what happens or dictate the story to you. Provide enough paper so your child can put the beginning, middle and end of the story on different pieces of paper. Then your child can add drawings. With your assistance, have your child tape or staple the paper together so that it becomes a book. Make sure to put your child’s name on the cover as the author. Have your child read the story to family and friends.
This Halloween Hidden Pictures activity book is a trick and a treat, combining the fun of beloved Hidden Pictures puzzles and coloring with highlighters. Pumpkins, scarecrows, monsters and other not-too-spooky creatures pop out in this Halloween twist on our popular puzzles.

